lilgpSetup User's Manual
1.1 Introduction
LilgpSetup is a companion utility for lil-gp that will
help you construct the parameter files necessary to run experiments
with lil-gp. It provides a set of fill-in forms that are
organized by the type of parameters they are responsible for. You
simply enter parameters in the required fields, many of which already
contain default values that follow the recommendations found in John
Koza's Genetic Programming and Genetic Programming II.
Once the parameters have been entered, lilgpSetup will parse
them and report any errors or warnings it has found. After the you
have resolved the errors, lilgpSetup will automatically
generate a parameter file that is ready to be used by
lil-gp.
If you are unfamiliar with genetic algorithms, genetic programming, or
lil-gp, then you should begin by reading the lil-gp User's
Manual.
1.1.1 Features
lilgpSetup features include:
- Ease of use: graphical interface allows point and click selection
of several parameters
- Secure: built-in error checking for every parameter allows nearly error-proof entry of parameters
- Parameter
file generation: automatically creates the lil-gp parameter file
- Parameter file support: able to read existing parameter files
and edit them
- Visual sub-population editor: graphical editor
allows point and click construction of sub-population exchanges
- Complete: supports most of the lil-gp parameter file
features
- Portable: written in Java for portability
- Help: point
and click access to definitions of every parameter
1.1.2 Limitations
lilgpSetup does not support
the following features of lil-gp:
- no built in support for any of the parameters
associated with problems that define individuals in the population as
sets of trees, rather than as single trees. However,
these parameters can be entered in the User Defined Parameters
window, but they will not be checked for errors.
The following table summarizes the parameters that are not supported:
| tree[#].max_nodes
|
| tree[#].max_depth
|
| init.tree[#].method
|
| init.tree[#].depth
|
| exch[#].from.tree[#]
|
| exch[#].fromselect[#]
|
- No support for parameter file pre-processor directives
- Not guaranteed to read parameter files that were not
created with lilgpSetup. Unknown parameters are placed
in the User Defined Parameter window.
1.1.3 Author
This software was written by Ryan Shoemaker under the direction
of Dr. William Punch. Other companion utilities for lil-gp
have been developed by Ryan Shoemaker and Dave Guyette as part
of a joint project.
Comments and suggestions may be sent to:
shoema16@cps.msu.edu
punch@cps.msu.edu
Department of Computer Science
3115 Engineering Building
Michigan State University
East Lansing, MI 48824
USA
1.2 Getting Started
When you unpack the distribution, you should get this
directory tree:
lilgpSetup/
    classes/          (byte-code files)
    docs/             (documentation files)
        images/       (image files used in documentation)
    javadocs/         (source-code documentation files)
        images/       (image files used in source-code documentation)
    src/              (source-code files)
Before using lilgpSetup, you must have Java JDK 1.02 installed
on your system. To generate the .class files, change into the lilgpSetup/src directory and type:
javac -d ../classes *.java
To run lilgpSetup, simply change into the lilgpSetup/classes directory and type:
java lilgpSetup
If you are running the utilities under Windows95/NT, you will have to
modify the paths in the above commands and also add the lilgpSetup/classes directory to your
CLASSPATH in place of the dot
directory ".".
This is version 1.0 of lilgpetup. Updates and information
related to lilgpSetup can be found on the World Wide Web at http://isl.cps.msu.edu.
1.3 Window Descriptions
The user interface for lilgpSetup is structured around the
different parameter categories outlined in Chapter 5 of [Zon96]. Each
parameter category has a panel dedicated to it in lilgpSetup
and switching between them is accomplished by clicking on the buttons
on the left-hand side of the main window. Each panel contains a number
of fields and components that allow you to select values for the
parameters that control the operation of lil-gp. Several of
these components already contain values when you run
lilgpSetup. These are the default values that the system
assumes if you do not change them. Each component has a label next to
it that can be used to request immediate help for that parameter.
Simply place the mouse over the label and hold down the Ctrl button while you click on the label.
This will open the on-line help system to a page that contains
information about the selected parameter.
This remainder of this manual will be dedicated to providing
screen-by-screen description of every feature available in
lilgpSetup. Each section will focus on a specific window in
the system and the features available from it.
1.3.1 Menu Options
The only two menus available on the menubar are File and
Help. The File menu offers three options: Open,
Save As, and Exit. Selecting the Open or Save
As menu items will open a file dialog and allow you to open and
save parameter files. Selecting the Exit menu item will exit
the system after asking for confirmation. The Help menu has
two menu items: Help and About. Selecting Help
will open an on-line help system that will allow you to search by
keyword and selecting About will display information about the
author and version of lilgpSetup.
1.3.2 The General Parameters Window
This window allows you to enter all of the parameters
that control the over all operation of lil-gp. As you can see
in Figure 1, this parameter panel contains three textfields for
entering parameter values. The following table summarizes legal
values for these fields:
| Parameter Name
| Expected Data Type and Range
| Default Value |
| max_generations
| positive integer | none
|
| pop_size
| positive integer | none
|
| random_seed
| integer | 1
|

Figure 1 - General Parameters Window
1.3.3 The Output Parameters Window
This panel allows you to enter parameters that control lil-gp's
output files and checkpoint files.
| Parameter Name | Expected Data Type and Range
| Default Value |
| output.basename
| string | lilgp
|
| output.detail
| integer between 0 and 100
| 50 |
| output.stt_interval
| integer between 1 and max_generations
| 1 |
| output.bestn
| integer between 1 and pop_size
| 1 |
| output.digits
| positive integer | 4
|
| checkpoint.interval
| integer between 1 and max_generations
| none |
| checkpoint.filename
| string | gp%06d.ckp
|
| checkpoint.compress
| string | none
|

Figure 2 - Output Parameters Window
1.3.4 The Size Limit Parameter Window
This panel allows you to enter the parameters that control the size of
individual trees in the population.
| Parameter Name | Expected Data Type and Range
| Default Value |
| max_nodes
| positive integer | none
|
| max_depth
| positive integer | none
|
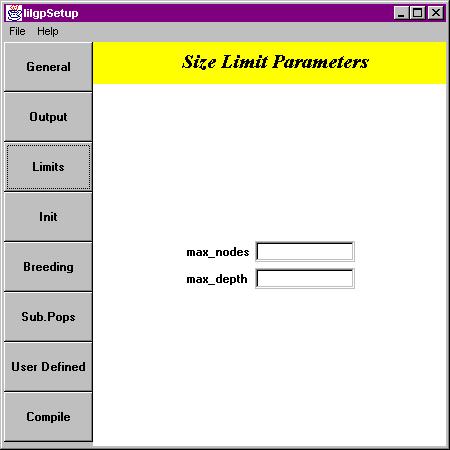
Figure 3 - Size Limit Parameters Window
1.3.5 The Tree Initialization Window
Parameters entered in this window will control how the population of
trees is initialized.
| Parameter Name | Expected Data Type and Range
| Default Value |
| init.method
| half_and_half, grow, or full
| half_and_half |
| init.depth
| string | 2-6
|
| init.random_attempts
| positive integer | 100
|
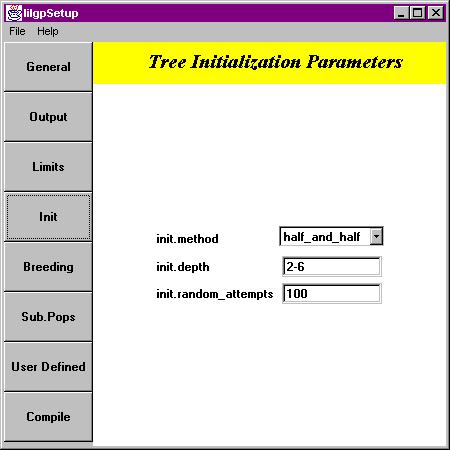
Figure 4 - Tree Initialization Parameter Window
1.3.6 The Breeding Parameter Window
This window allows you to select the number of breed phases and
whether or not to use probabilistic operators. After entering the
number of breed phases, click the 'Go' button to open the
Phase Parameters window where you will select the individual
operators and rates. If you want to delete all of the current breed
phase operators and rates from the database, simply press the
'Purge' button.
| Parameter Name | Expected Data Type and Range
| Default Value |
| breed_phase
| positive integer | none
|
| probabilistic_operators
| on or off | on
|
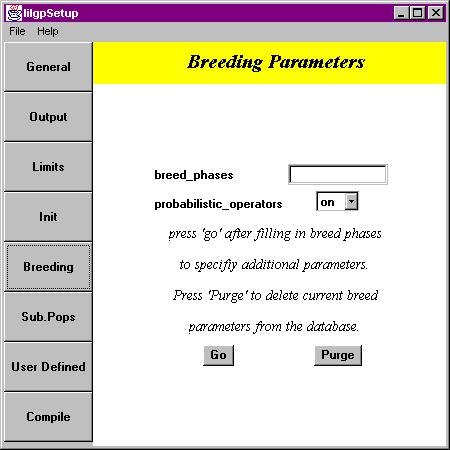
Figure 5 - Breeding Parameters Window
1.3.7 The Phase Parameters Window
This window allows you to select the breed operators, selection
methods, and breed rates for each phase. The left-hand panel contains
all of the parameter labels for the phase panels. The phase panels
respond to your selections by hiding and showing only those options
appropriate for the current selection. For example, when you select
'crossover' in an operator field, the 'cutoff', 'proportion', 'size',
'method', and 'depth' options are hidden since they do not apply to
the crossover operation. When you are through selecting the options
for each phase, click the 'Accept' button to save your changes
and return to the main window.
| Parameter Name | Expected Data Type and Range
| Default Value |
| operator
| crossover, reproduction, or mutation
| crossover |
| selection
| fitness, fitness_overselect, tournament, inverse_fitness, random, best, or worst
| fitness |
| cutoff
| real number between 0.0 and 1.0
|
if pop_size <= 1000
else 320/pop_size
|
| proportion
| real number between 0.0 and 1.0
| 0.80 |
| size
| integer between 1 and pop_size
| 2 |
| keep_trying
| on or off | on
|
| internal
| real number between 0.0 and 1.0
| 0.9 |
| external
| real number between 0.0 and 1.0
| 0.1 |
| method
| half_and_half, grow, full
| half_and_half |
| depth
| string | 0-4
|
| rate
| real number between 0.0 and 1.0
| none |
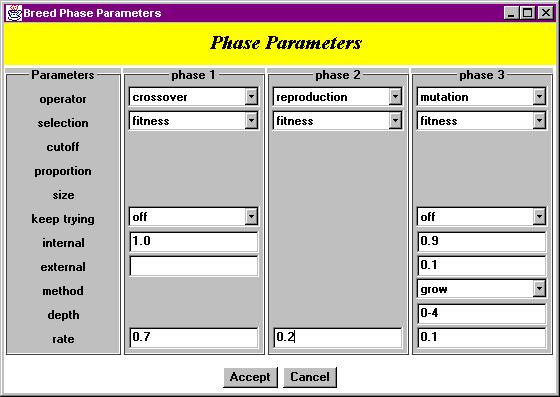
Figure 6 - Phase Parameters Window
1.3.8 The Sub Population Parameters Window
This window is very similar to the Breed Phase Parameters
window. After entering the number of sub-populations and the exchange
frequency, click on the 'Go' button to open the exchange editor
and exchange graph. This window also has a 'Purge' button on
it to remove any exchange parameters that are currently in the
database.
| Parameter Name | Expected Data Type and Range
| Default Value |
| multiple.subpops
| positive integer | 1
|
| multiple.exch_gen
| integer between 1 and max_generations
| none |
Note, there is no field for multiple.exchanges.
This parameter is automatically entered into the database by
lilgpSetup when you close the sub-population editor.
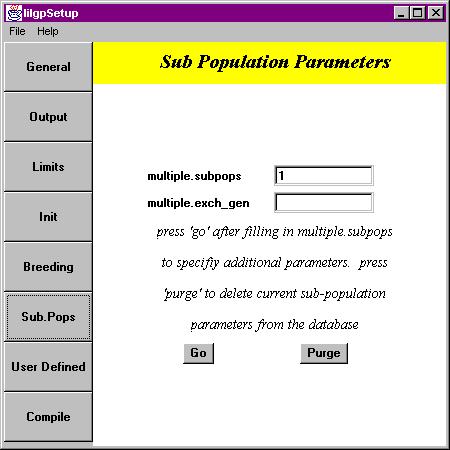
Figure 7 - Sub Population Parameters Window
1.3.9 The Sub Population Editor Window
This window contains all of the controls needed to create and edit
sub-population exchanges. Adding a new exchange requires you to set
the five components in the top of the panel and click on the
'Add/Replace' button. After adding the new exchange, you will
see a verbal description of it appear in the bottom summary area. You
should also see a graphical representation of it in the Sub
Population Graph window. There are several other options
available to you in this window. To delete an existing exchange,
select it in the summary portion of the window and press the
'Delete' button. Similarly, you can edit and replace exchanges
by clicking the appropriate buttons.
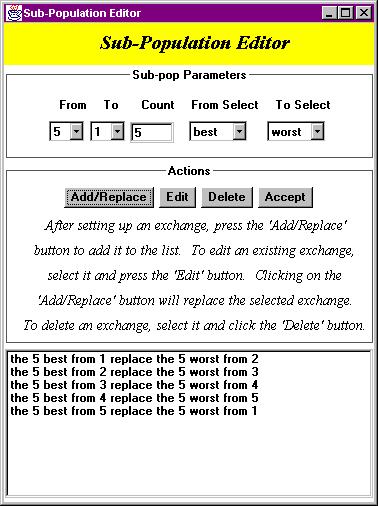
Figure 8 - Sub Population Editor Window
1.3.10 The Sub Population Graph Window
In this window, you will find a graphic representation of the
sub-population exchanges that you have entered in the exchange editor.
There are no controls available in this window - it is for visual
purposes only.
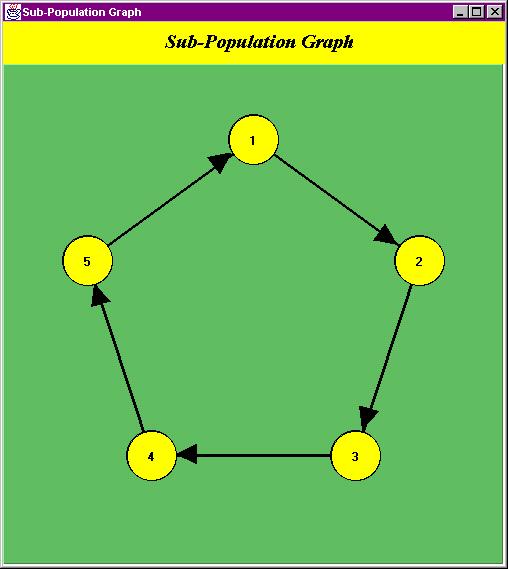
Figure 9 - Sub Population Graph Window
1.3.11 The User Defined Parameters Window
Any application specific parameters may be typed in this window as
long as they are of the form 'parameter =
value' Even though there is no explicit support for the
multi-tree individual parameters listed in the Limitations section,
you may enter values for them here. Unfortunately, the validity of
the parameter values can not be checked.
If lilgpSetup fails to recognize a parameter while reading from
a parameter file, then it will assume that the parameter is user
defined and place it in this window. As a consequence, if you hand
edit a parameter file (i.e. in emacs or notepad) and make a
typographical error, that parameter will likely appear in this window
along with any legitimate user defined parameters.

Figure 10 - User Defined Parameters Window
1.3.12 The Compile Button and Error List
At any time during the process of entering parameters, you may press
the 'Compile' button found in the lower left corner of the main
window. This will cause lilgpSetup to collect all of the
parameters from each window and check them for errors. When this
process is complete, the Error List window will open (or be
updated if it is already open) and display the results. Figure 11
shows what this window looks like when it contains errors. In this
case, lilgpSetup has found an error with the pop_size parameter. Consequently, it can
not verify any of the variables that depend on pop_size, so a warning is issued for output.bestn. Entries beginning with '>' are comments inserted by lilgpSetup.
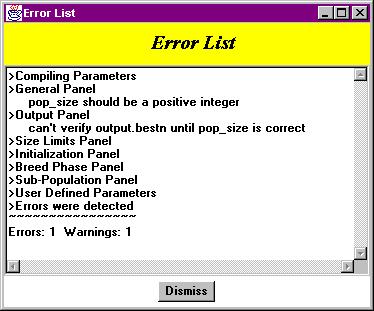
Figure 11 - Error Window With Errors
Once you have fixed all of the errors, the Error
List window should look like Figure 12, and you are ready
to save the parameter file. It is not necessary to manually compile
the parameters before saving the parameter file, lilgpSetup
automatically checks them for errors before allowing a save to
occur. As a result, there is no way of saving a set of parameters
that contains either errors or warnings.
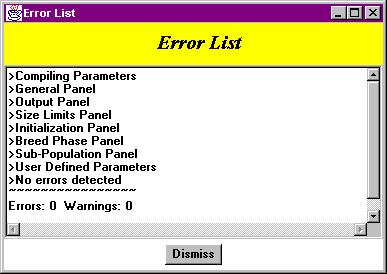
Figure 12 - Error Window With No Errors


